In MS Access, split forms are beneficial and even perilous too. But sometimes, they refuse to work when you put them inside the navigation form. In such instances, you must create a split form in Access using the Split Form Tool or VBA (Visual Basic for Applications) to make it work again. So, here is the user-friendly tutorial for you on how to create a split form in Access database.
So, let’s start with the post…
Free MS Access Database Repair Tool
Repair corrupt MDB and ACCDB database files and recover deleted database tables, queries, indexes and records easily. Try Now!
By clicking the button above and installing Stellar Repair for Access (14.8 MB), I acknowledge that I have read and agree to the End User License Agreement and Privacy Policy of this site.
Quick Navigation:
- What Is a Split Form In Access?
- How To Create a Split Form in Access with Split Form Tool?
- How To Make A Split Form In Access Using VBA Code?
- Try The Recommended Way To Repair Corrupted MS Access File
- Frequently Asked Questions
What Is a Split Form In Access?
A split form is a form in the MS Access that allows displaying the same datasheet or record in two views at the same time. Even though two views are associated with the same information source & are synchronized with each other.

However, if you select a field on one side of a form, then it selects the same field in another part of the form. It means that whatever changes you make on one side of your split form, the same changes will apply to the other side of the form.
When to Use a Split Form in Access?
Split forms are ideal when you need to view and edit records simultaneously. They work well in situations like:
- Managing the customer information.
- Recording student/employee data.
- Tracking sales & inventory.
- Reviewing large datasets quickly.
How To Create a Split Form in Access with the Split Form Tool?
Creating a split form in the Access is a much easier task than you think it is. Nevertheless, it can be only possible when you have the right solution with you. Undoubtedly, with the help of Split Form Tool it is possible.
Here is the step-by-step guide on how to make a split form in Access using Split Form Tool. Let’s try them:
- Under a Navigation Pane, you have to click on query or table that holds the data you need on your form.
- At this time, on a Create tab, under Forms group, you have to click on the More Forms.
- Now, click on the Split Form.

Nevertheless, a default split form will launch as displayed below. Though, you can easily modify the settings in a form property.

How To Set Form Separator In A Certain Position?
Step 1: Switch to the Design view simply by right-clicking on a form under Navigation Pane >> click on Design View.
Step 2: In case, a property sheet isn’t displayed, then press F4 key to show it.
Step 3: Here, you can simply change the Height of a Form Header as per your requirement. (For example, set to 1”)

Step 4: Under Property Sheet Format tab, you have to change the below things:
– Change Navigation Buttons to: No
– Change Scroll Bars to: Neither
– Change Dividing Lines to: No
– Change Save Splitter Bar Position to: Yes
– Change Split Form Splitter Bar to: No
– Change Split Form Size to: 1” (For example- “1”)
– Change Border Style to: None

Form View
Now, from property settings which you can see above, the form sight will show like a below picture.

Also Read: How To Create Calculated Field In Access?
How To Turn the Existing Form into The Split Form?
Well, you can switch your current form into the split form simply by setting some of the properties in a form.
- First of all, you have to open a form in the Layout view simply by right-tapping it in the Navigation Pane & then click on Layout View.
- In case a property sheet isn’t displayed, you have to press F4 key to show it.
- Choose the Form from a dropdown list, which you can see at the upper side of a property sheet.
- Now, on a Format tab, in a Default View dropdown list, you have to choose the Split Form.
- Finally, save & close a form, & make double-click on a form in the Navigation Pane in order to open it in the Form view.
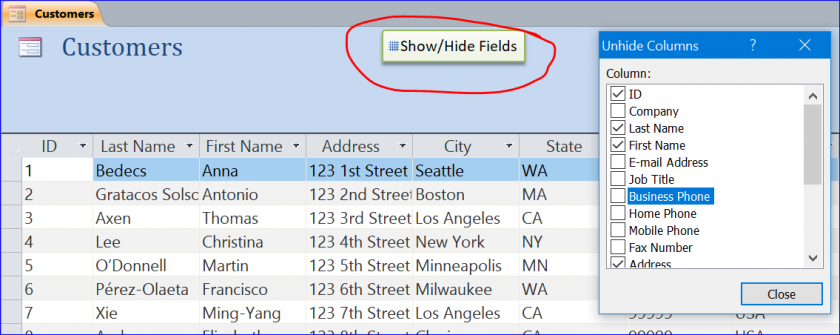
How to Hide or Unhide The Fields On A Split Form?
You can even use UnhideColumns commands to hide/unhide the field on a datasheet of your Split Form. Here are the easy steps on how you can do so:
- First, Add the button
- Choose [Embedded Macro] option on a Property Sheet or On Click Event.
- Then, add the RunMenuCommand in a Macro Window
- Now, add the UnhideColumns in a RunMenuCommand
- Finally, you have to Save & Close a Macro window.

When you uncheck the checkbox in front of a column name, your field (column) will be wiped out from a datasheet view.
How To Make A Split Form In Access with VBA Code?
VBA code is another option that can help you to create a split form in Access. Here’s how you can do so:
Step 1: Open a split form & update a Default View.
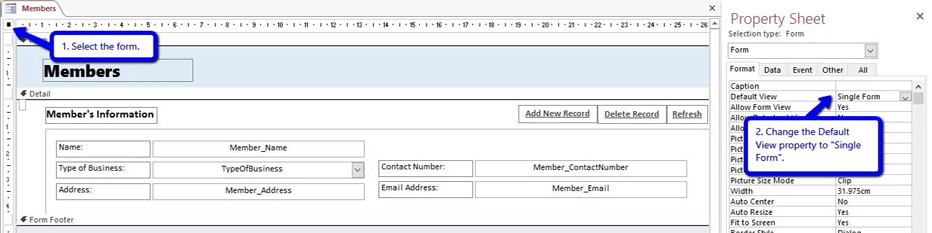
- Simply open a split form.
- Though in the design view, choose the Form.
- After this, go to a Property Sheet or you can ALT + Enter keys together > Form
- Now, change a default view to the Single Form.
- Finally, close a form & save the changes.
Step 2: Make a new copy of your form.
- Initially, go to a Navigation Pane.
- Make right tap on the form & choose Copy.
- At this time, right-tap on the blank area under a navigation pane & choose Paste.
- Now, rename the Form. Add it with the “_Datasheet”.
As for Example:
- Copy of a Form:- Members_Datasheet
- Form:- Members
Step 3: Open a Datasheet Form & update its view properties.
- Just open a Datasheet form.
- In the design view, you have to choose the Form.
- After that, go to a Property Sheet then Form
- Now, update the below properties:
- Allow the Datasheet View to: Yes
- Default View to: Datasheet
- Allow the Form View to: No
- Finally, close a form & save.
Step 4: Re-open a Main Form & add Datasheet Form simply as the Subform.
- Simply open main form (which was copied) under the design view.
- Then, Add the subform.
- First, go to the Design menu >> then select the Subform/Subreport.

- Tap on a Detail area.
- Now, a SubForm Wizard seems.
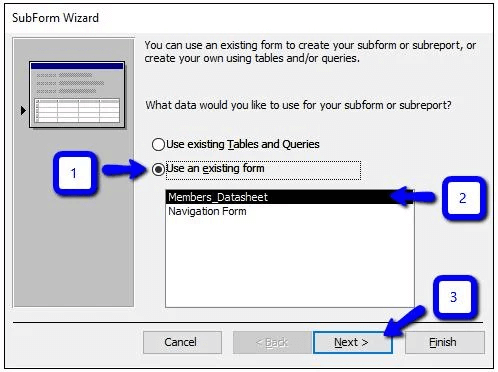
- Here, click on the ‘Use the existing form’ >> choose your data sheet form and then click on Next.
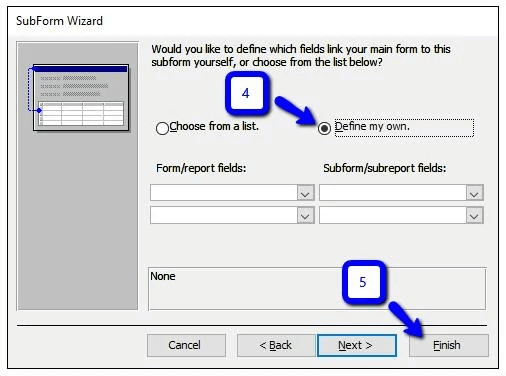
- Choose ‘Define my own’ >> tap on Finish
- Now, the data sheet form is a subform. Change it to your favourite position and size.
Step 5: Lastly, add a code.
- First, open a VBA Editor or you can press the (ALT+F11).
- Choose a main form & paste the below code:
'MAIN FORM
Option Explicit

Private Sub Form_AfterUpdate()
   Me.Members_Datasheet.Requery
End Sub

Private Sub Form_Current()
   If Me.NewRecord Then
     Me.Members_Datasheet.Form.Recordset.AddNew
   Else
     Me.Members_Datasheet.Requery
   End If
End Sub
- Once you have copied the code, then replace the term Members_Datasheet by a real name of a datasheet form.
- After finishing that, choose the Datasheet Form via a Project menu & copy the below code:
'SUBFORM/DATASHEET FORM
Option Explicit

Private Sub Form_AfterUpdate()
   Me.Parent.Form.Requery
End Sub

Private Sub Form_Current()

  Dim pk_field As String, pk_tbox As Control
  Dim primaryKey As String, strSearch As String

  Set pk_tbox = Me.Member_ID 'textbox containing primary key *
  pk_field = "Member_ID" 'primary key field name *

  primaryKey = Nz(pk_tbox.Value, 0) 'change value to 0 if null
  pk_field = "[" & pk_field & "]" 'enclose field name with brackets

  If primaryKey <> 0 Then 'if not null (or not a new record)
    strSearch = pk_field & "=" & primaryKey
    Me.Parent.Recordset.FindFirst strSearch
  Else
     Me.Parent.Form.Recordset.AddNew
  End If

End Sub
- Now, update values for below term:
- pk_tbox– states to a text box holding a primary key option.
- pk_field– states to a record of the primary key source.
- Once done, you have to save all the changes by pressing (CTRL+S) & closing the VBA Editor.
That’s it!
Tips for Working with Split Forms
- Use the Property Sheet in the database to modify design settings.
- It is important to add conditional formatting for clearer data presentation.
- Apply filters in datasheet view for quick record searches.
- Lock specific fields to prevent editing errors.
These small adjustments enhance the efficiency of your split form in Microsoft Access.
Try The Recommended Way To Repair a Corrupted MS Access File
When it comes to repairing corrupted MS Access files, there is nothing better than the Access Database Repair Tool. It is a progressive solution for all Microsoft Access Database errors or issues.
Besides, this feature-loaded program can repair each and every data, such as reports, tables, forms, queries, macros, etc.
The best thing about this tool is that it has a powerful algorithm that thoroughly scans the severely corrupted/damaged .mdb & .accdb files and then fixes them.
So, without any delay, just download and install this software on your PC and follow the steps below to know how it works.

* By clicking the Download button above and installing Stellar Repair for Access (14.8 MB), I acknowledge that I have read and agree to the End User License Agreement and Privacy Policy of this site.
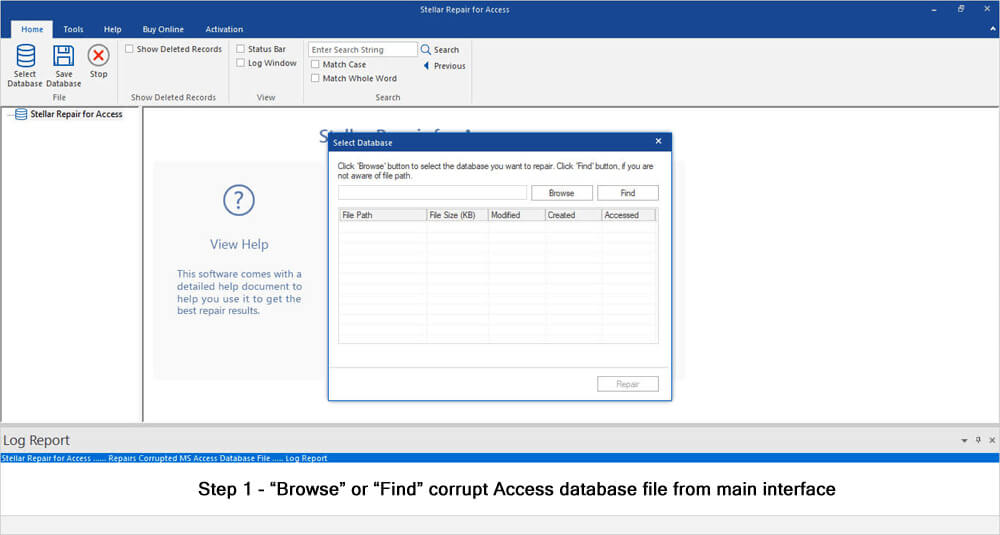
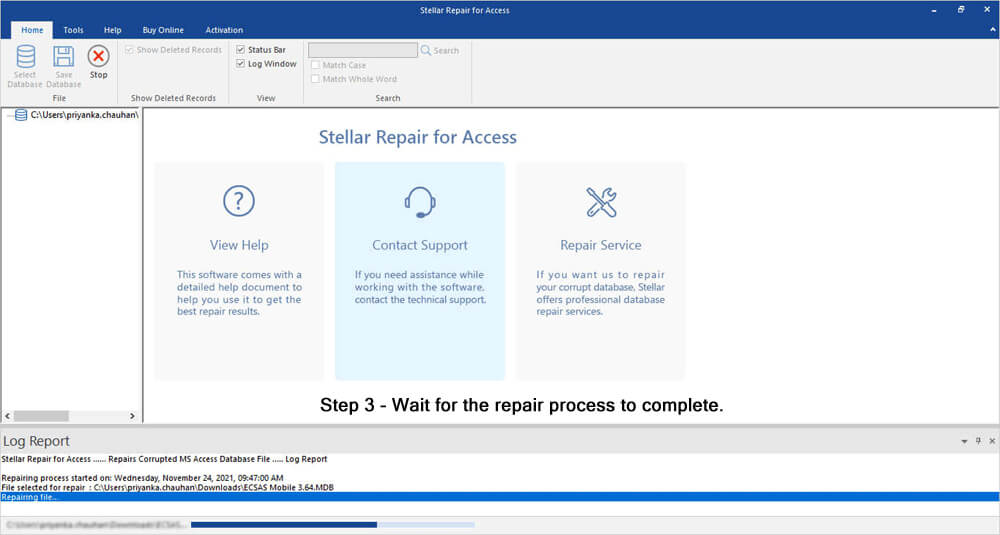
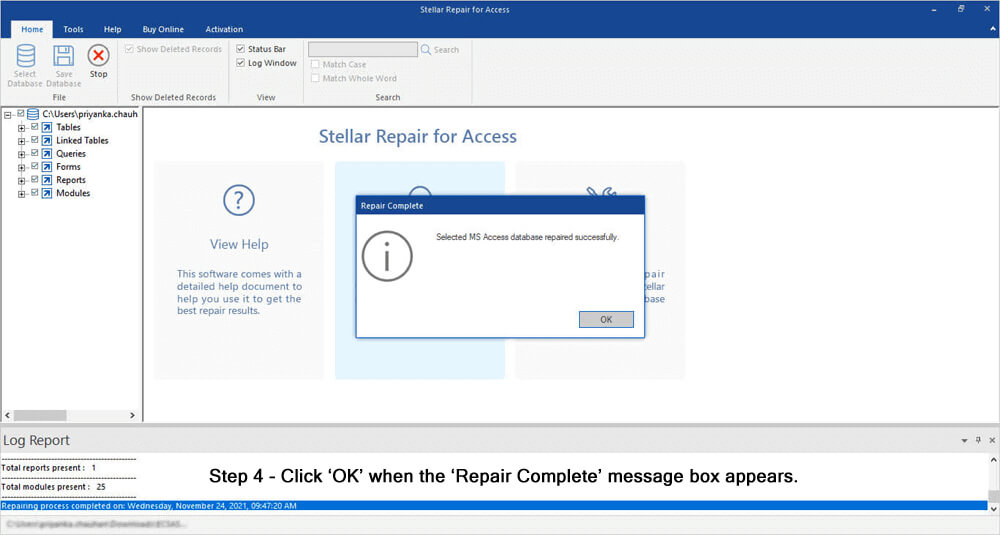
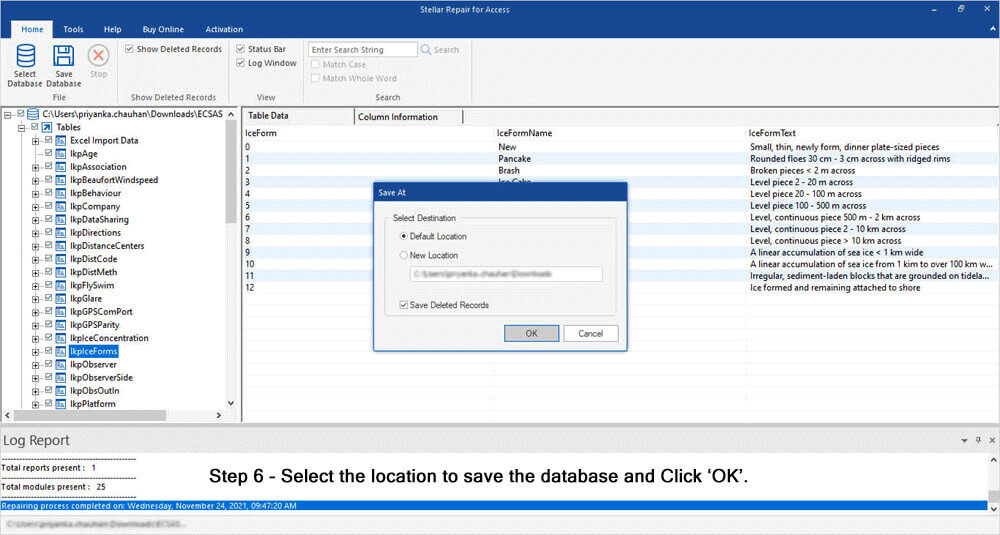
Steps To Repair Corrupted/Damaged MS Access Database


Frequently Asked Questions:
What Is the Use of Split Form in Access?
Generally, a split form is the form in the MS Access that displays the same information or data in two views at the same time.
Which View Must Be Used to Convert an Existing Form Into A Split Form?
Layout view must be used to open and convert an existing form into a split form.
How Do I Rename a Split in Access?
You can rename a split in the MS Access by trying the workarounds below:
- Rename a split on a backend
- You can change a split form to a frontend design view
- Remove the previous field name & then insert a new field name into the form.
Why Would We Want to Split Data Into Separate Tables?
Well, splitting the data into multiple associated tables takes less places to update and fewer redundant data. So, it would be beneficial to split the information into separate tables.
Final Verdict
Creating a split form in MS Access is simple and highly effective. It allows users to interact with data in two ways at once. With this tool, database management becomes faster, more accurate, and user-friendly. By customizing the layout and applying the best practices mentioned in this blog, you can build a powerful and professional form tailored to your needs.
I hope you enjoyed reading this post!
References:
 Still having issues? Fix them with this Access repair tool:
 This software repairs & restores all ACCDB/MDB objects including tables, reports, queries, records, forms, and indexes along with modules, macros, and other stuffs effectively.
- Download Stellar Repair for Access rated Great on Cnet (download starts on this page).
- Click Browse and Search option to locate corrupt Access database.
- Click Repair button to repair & preview the database objects.
Pearson Willey
Pearson Willey is a website content writer and long-form content planner. Besides this, he is also an avid reader. Thus he knows very well how to write an engaging content for readers. Writing is like a growing edge for him. He loves exploring his knowledge on MS Access & sharing tech blogs.