In Microsoft Access, PivotTables simplify the large data sets. You can distinguish trends, compare values, and identify outliers. A pivot table allows you to summarize and analyze complex data. It transforms raw records into meaningful insights by organizing data into rows and columns with calculated values. However, it is important to know how to create MS Access pivot table before using it in the database.
So, let’s scroll down this page to know complete info regarding PivotTables.
Free MS Access Database Repair Tool
Repair corrupt MDB and ACCDB database files and recover deleted database tables, queries, indexes and records easily. Try Now!
By clicking the button above and installing Stellar Repair for Access (14.8 MB), I acknowledge that I have read and agree to the End User License Agreement and Privacy Policy of this site.
What is MS Access PivotTable?
In MS Access, the Pivot table is a programming tool that provides you the option to recognize and summarize selected columns and rows of data in a spreadsheet or database table to get the desired report. The Pivot table in Access doesn’t actually change the spreadsheet or database itself.
You can use the Access pivot table to make a list of unique values because it summarizes data that can be used to find unique values in a field. It’s a good way to take a quick overview of all the values appearing in the field and other inconsistencies.
Have a look over the Access pivot table screenshot:
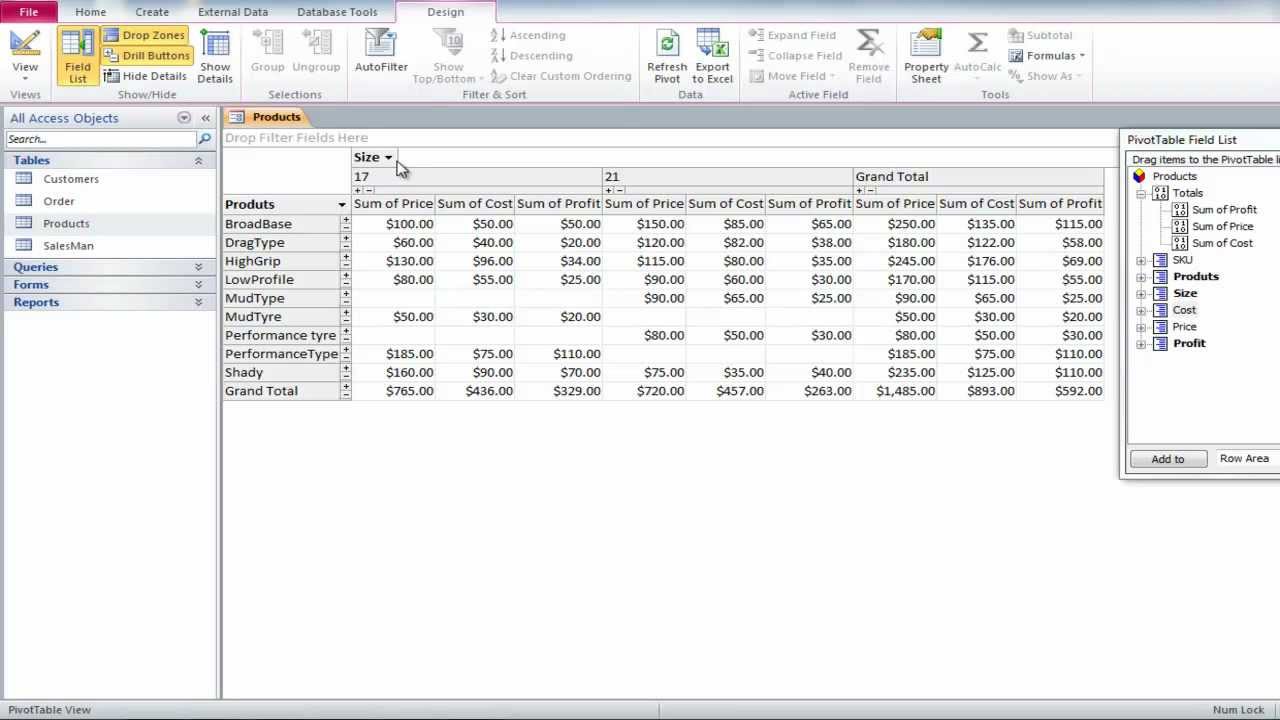
Apart from this, you can also make use of the Access PivotTable and PivotChart views to perform interactive data analysis or create dynamic, interactive charts.
Also Read: How to Unhide Hidden Objects in Access Database? – (2025 Guide)
How To Create MS Access Pivot Table?
In order to make a PivotTable or PivotChart view for Access queries, forms, or tables. Here is how to create a PivotTable view and a PivotChart view for an Access Query.
Step 1: Create a query
If you do not have a query to use for PivotTable view, then create a new one. To know how this is to be done, you can check out the post regarding Access Query Designing.
Step 2: Open up your query in the PivotTable view
Once the query has been created, try out the following steps to open the query in PivotTable view.
- Go to the Navigation Pane and make a double-tap to the query.
- Now from the Home tab, go into the Views group and tap the View option. After then hit the PivotTable View.

This will open the PivotTable view without having any data or fields.
Step 3: Within PivotTable View Add Data Fields
Now add some fields, which make up the columns and row headings of PivotTable view. Also, enter the detail & filter fields. For this, it’s important to have clear visibility of the Field List.
- If in case, field list not appearing clear to you then go to the Design tab and choose the Show/Hide group after then hit on the Field List option.
Add column fields:
To add a column field:
- At first drag the field present in the Field List in the PivotTable area which is marked by Drop Column Fields Here.
Or else, you can just add a filter field through the following steps:
- Choose a field from Field List.
- From the bottom section of the Field List, choose the Column Area option from the drop-down list. After then hit the Add to option.
Add row fields:
Row fields are one that makes up the rows of the Pivot Table in Access.
Steps to add a row field:
- At first drag the field present in the Field List in the PivotTable area which is marked by Drop Row Fields Here.
Apart from that, you can just add a filter field through the following steps:
- Make a selection for the fields from Field List.
- From the bottom section of the Field List, choose Row Area option from the drop-down list. After then hit the Add to option.
Step 4: Make Changes In Field Captions & Format Data
- Now in the pivot table, just choose the label for the field which you need to change.
- From the Design tab, get into the Tools group. After then hit on the Properties option.

- In the dialog box of Properties, click on the Captions option.
- Within the opened Caption box, just write the caption which you want. After that press the ENTER button.
- You can also apply different formatting options for your caption.
- now in the same Properties dialog box, you need to tap the Format tab.
- Make use of the command on the format tab for sorting the data. Also, to format cells and text.
- If your PivotTable has total rows, then click the Hide Details option from the Design tab. This will hide all detail fields and only display the total fields.
- Repeat steps 3 to 7 for setting up the format and captions for complete fields.
Step 5: Filter, Sort, & Group Data
- To filter the data, hit the down arrow present next to the field name. After that either choose or put a checkmark over the filtering option that you require.
- For grouping the data:
- In your PivotTable, tap on the values that you require for grouping.
- After that, make a right-click on any one of the chosen values. After that, tap on the Group Items option.
After the addition of the grouping level, you need to choose the group. And then make use of the Collapse Field and Expand Field commands from the design tab to hide or view each field in a group.
Also Read: How to Make MS Access Database Executable?- 2025 Guide
What Issues Encountered While Working With The Access Pivot Table?
While working with the Access pivot table most commonly encountered issues with which users usually get stuck off are :
- Access Pivot Table View Missing or
- PivotTable and Chart controls don’t work
Symptoms
Well, the “PivotTable and Chart controls don’t work” error can be encountered on any MS Access 2003/2007/2010 application. At that time it throws the following error message.
- Your Microsoft Office Access database or project contains a missing or broken reference to the file ‘0WC10.DLL’ version 1.0.
- Your Microsoft Office Access database or project contains a missing or broken reference to the file ‘0WC11.DLL’ version 1.0.
Even after the appearance of such an error, you can open your Access 2007 database file, but any of the PivotTable controls or Microsoft Office Chart controls contained on the form, report, or data access page don’t work. Along with that, the Access display message “There is no object in this control” each time you try to open an object that contains a PivotTable control or a Chart control.
Resolution To Fix MS Access PivotTable Controls Not Working Issue
![]()
In order to make an Access 2007 application to shows your previous version PivotTable controls and PivotChart controls correctly. You need to download and install the right .dll file first. Make use of the following procedure to find out the missing reference file and then download and install those files.
Determine which reference is missing
- First of all, open your Access Database 2007.
- Perform the following steps to open the Visual Basic Editor:
- Now, open an existing module by double-clicking it in the Navigation Pane.
- On the Create tab, in the Other group, tap the Module option. If you are unable to find this command then tap to the arrow beneath either the Macro or the Class Module button, and then hit the Module option.
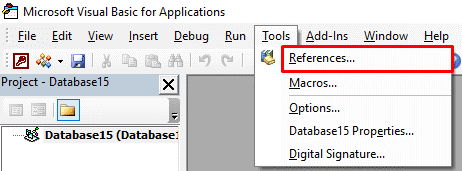
- In the Visual Basic Editor, go to the Tools menu, and tap the References.
4. In the reference dialog box, within the Available References, search for the references which are marked as MISSING.
-
- If version 10.0 or version 11.0 of the MS Office Web Component is missing, follow the steps to download and install the required .dll file.
Steps to Download and install the required file
- First of all, search for the Microsoft Download Center for exe or owc11.exe, depending on the version that you have to find through the above-mentioned reference missing section.
- After that, follow the instructions as guided in the Download Center to download and install the file properly.
Note: either you can save the .exe file and then run it to install the .dll file, or you can make a shortcut to Run option to install the .dll file directly from the Download Center.
- After the complete installation. Just tap on the Close and then reopen your Access database application to make sure that the Access database controls were working as expected.
Frequently Asked Questions:
How Do I Add a PivotTable to the Quick Access Toolbar?
To add a PivotTable in Access, right-click anywhere on the Quick Access Toolbar. On a shortcut menu, you have to click on the Customize Quick Access Toolbar. Under the opened dialog box, click on the down arrow in the Choose commands from field, and from the list, select Add PivotTable.
How to Link PivotTable to Access Database?
To link PivotTable to an Access database, follow the steps below:
- Click on the Data tab > From Access.
- Under the Select Data Source dialog box, find the Access database that you need to connect to, and click Open.
- Now, under the Select Table dialog box, choose the table you need >> click OK.
How To Enable Power Pivot in Office 365?
To enable Power Pivot in Office 365, follow the steps below:
- Go to the File tab > Options > Add-Ins.
- In the Manage box, click on the COM Add-ins > Go.
- Check the Microsoft Office Power Pivot box, and then click OK.
Final Thoughts
Creating pivot tables in Microsoft Access is a straightforward process once you follow the correct steps mentioned above in this post. It boosts data analysis inside your database environment. Use it to create reports, dashboards, and data insights fast and efficiently.
I hope you enjoyed reading this post on how to create MS Access Pivot Table.
References:
This software repairs & restores all ACCDB/MDB objects including tables, reports, queries, records, forms, and indexes along with modules, macros, and other stuffs effectively. Still having issues? Fix them with this Access repair tool:
Pearson Willey
Pearson Willey is a website content writer and long-form content planner. Besides this, he is also an avid reader. Thus he knows very well how to write an engaging content for readers. Writing is like a growing edge for him. He loves exploring his knowledge on MS Access & sharing tech blogs.